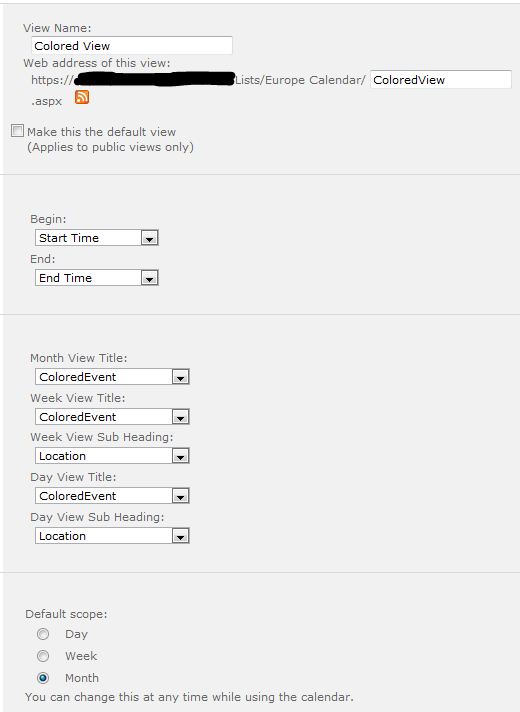
One request we frequently receive is to allow to colour events in a Calendar list for easier finding and viewing. Path to SharePoint offers a script that you may want to check. And that's basically what I did; didn't feel like reinventing the wheel. So go here and follow the instructions. If you have any questions about the original site, contact Christophe@PathToSharePoint.com But before you start, make sure you have the following: - Calendar list ready to be used - A choice column of your preference, which will be use to categorize the events on your Calendar list - A displayed column already designated (for example, Title) - A separate Colour column (calculated value) - Another calculated value column (for example, ColouredEvent) Follow the instructions on that site and you should be all set. If you have any doubts, I can assure you we were able to successfully implement this solution on SharePoint 2010. It might get a little bit tricky when you have to create the view that will display the colour-coded events. If you don't pick the right columns, it won't work. Find below a sample image of how the Calendar view should be set up. The final thing you will need is to reference the script from the page where you are displaying the coloured view of the Calendar list. To do so, upload the script to a document library, go back to the page where your calendar view displays, edit it to insert a Content Editor Web Part (CEWP), and reference the script file from the CEWP). Save and publish the page. It should work.
It is possible to create menus in SharePoint without having to use JavaScripts. The main advantage of not using JavaScript is that there's no need to have JavaScript enabled on visitors' computers. The menu will still work seamingless, won't break, and all images will be loaded regardless.
Another advantage of the solution presented on this post is that with other solutions you need 2-3 images per menu option: One for when the page is not active, one for when the user points at the menu option (hovers), and one for when the page is active. With the solution presented in this page, you will only need one image per menu option.
Finally, the last advantage is no flickering when hovering over the menu options. With other solutions where more than one image is used for each menu option status is a flickering effect when the browser tries to upload the image for each particular status. This flickering is more notorious if the network performance degrades for whatever reason. You can avoid this effect by implementing the present solution.
What you need:
- Stacked images (one for each menu option)
- HTML code for links
- CSS code
Step 1: Create a "Stacked" Image
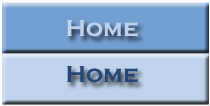 The first thing you need to do is create what's referred as a "stacked" image using a graphics tool such as PhotoShop, Fireworks, etc. A stacked image is an image that contains all states (inactive and hover) in one single image stacked one on top of the other. (See image to the left for an example.)
You will need to create one of these images per as many menu options as you may have. Once you have created your images, upload them to the appropriate SharePoint image library.
Take note of the actual size of your image (on a related note, all images should be the same exact size to work smoothly). You will need this information in the third step, where you will set the appropriate values on the CSS code. In our example, the image size is 210 x 106 pixels.
Step 2: Create the Markup on the Master Page
The HTML code needed is just a link with an id and a span element wrapped around the link text. You will need to insert it on your customized master page and where you want the left navigator to display.
<a id="homeMenu" href="<insert link here>" title="Home"><span>Home</span>
The ID given to the link in the example is "homeMenu." This allows you to style the link via your CSS. Then, the actual link text is placed inside a span element, which means that you can hide the link text with your CSS and display the image instead, yet the link still looks like a regular text link to browsers not using the style sheet (such as, for example, a search engine spider or text-only browser).
You will need to insert this markup text for each of your menu options and changing the ID, HREF, and Title values for each option as appropriate.
Step 3: The CSS
Finally, to turn the regular text link into a rollover button, you need to modify your CSS style sheet by applying the CSS below.
#homeMenu
{
display: block;
width: 210px;
height: 106px;
background: url('<insert_link_to_image_here>) no-repeat 0 0;
}
#homeMenu:hover
{
background-position: 0 -106px;
}
#homeMenu span
{
display: none;
}
The display: block line allows you to give the link a width and height, as well as set your button image as a background. The next two lines set the width of the link element to the width of your image, but it also sets its height to half the height of the image (that would be the height of one of the button images in the stacked image). This means that just the top, normal button image will appear within the link by default. The bottom, which is the rollover image, is cut off, therefore remaining hidden.
The next line (background-position: 0 -106px;) selects the link's :hover pseudo-class to style the rollover state. What happens is that the background image shifts up, in this case by 106 pixels, which is half the image's height. This hides the normal button image above the top of the link element, revealing the rollover button image within the link. (Another way of thinking about it is as sliding the image upwards within the "window" of the link.) When the visitor moves their mouse away from the link again, the button slides back down 106 pixels, returning to its default position, and revealing the normal button image within the link.
The last line, display: none, hides the link text for browsers that support CSS and images.
(Optional) Step 4: Creating More Than One Button
If you want or need to create more than one rollover buttons, copy and paste the HTML and CSS as many times as needed. Just remember to give each button a unique ID in both the HTML and the CSS, as well as changing the background image for each button in the CSS.
Another alternative would be to style the link text to be in the center of the button image, rather than being hidden. In this case, you would only need one (blank) button image for all the menu options. The only con this approach has is that you lose some control over the look of your button text and the buttons may not look as nice.
Last Thing...
Don't forget to modify the master page to point to the customized CSS.
We have used the formula below to concatenate information such as document name and version, or to create unique IDs in SharePoint.
1. Create a Calculated value column
2. Use the formula below,
=CONCATENATE([ColumnName1],[ColumnName2])
Note: Replace the generic ColumnName1 and ColumnName2 in the example above with the name of your respective columns.
When the company migrated from WSS 3.0 to MOSS 2007 and then from MOSS 2007 to SharePoint 2010, we received a lot of requests from our customers to put a script that would redirect site visitors and users to the new site, if a new one had been created. And this is what this post is about.
Note: This solutions calls for the use of a Content Editor Web Part. As I have stated in previous posts, I am not too happy with the way SharePoint 2010 might change the code I put on Content Editor Web Parts. To prevent SharePoint from changing my code, I usually upload a TXT file to a document library on the site and I reference the file from the Content Editor Web Part.
1. Edit the page where you would like to include the redirect script
2. Add a Content Editor Web Part on the page
3. Edit the Content Editor Web Part properties, remove chrome, rename the web part to something more meaningful than 'Content Editor' (such as, Redirect), and make any other changes as applicable to your own situation
4. Select the Content Editor Web Part Click here to add new content link
5. Locate the HTML icon within the Markup section of the ribbon, select it, and then select Edit HTML Source
6. Type in (or copy and paste) the code below in the HTML Source web page dialog that displays
<script '"text/javascript"'>//<![CDATA[alert("This site has been moved to another location. Please update all existing bookmarks. You will be redirected momentarily.");//]]></script>
<meta http-equiv="refresh" content="10;url=https://www.sharepointbinder.com">
7. Select [OK] and save the page.
The script above is set up to redirect after 10 seconds. Modified this setting to your own needs.
Remember to also replace the URL above with the appropriate destination URL that applies to your particular situation.
Use the solution below if you are asked to provide a column in a SharePoint custom list that displays the day of the week based on another column that contains an actual date.
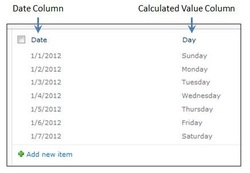 In the example to the left, the first column (Date) displays a date in the M/D/YYYY format, while the second column (Day) displays the day of the week for the date to the left.
The column to the left consists of a Calculated column.
The formula needed to translate the information in the Date column is:
=TEXT(WEEKDAY([Date]),"dddd")
Just replace Date with the (internal) name for the column applicable to your own list.
Use dddd to display the full name of the week (for example, 'Sunday').
Use ddd to display the abbreviated name of the week (for example, 'Sun').
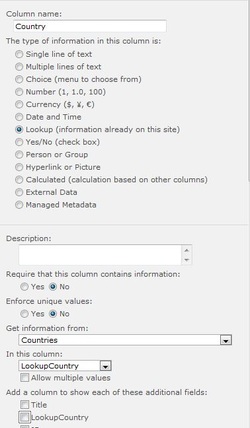
For some reason that Microsoft probably only knows, you cannot create lookup columns to Choice columns within other custom lists. Lookups seem to only work on Single Line of Text type of columns, which doesn't make much sense to me. However, there is a work-around using Calculated values.
I discovered this once when I was trying to add a lookup column pointing to a very extensive list of countries, and a few other things, such as regions, divisions, etc.
The purpose of using Choice columns is for most part to force the user to make selections from a predefined list, so as to avoid duplicate values or mispellings.
Why would Microsoft not allow pointing lookup columns to choice columns is beyond me. But well, let's dive in the work-around I found. By the way, this works for both MOSS 2007 and SharePoint 2010.
So the first thing we need to do is create a custom list where to host the Choice column.
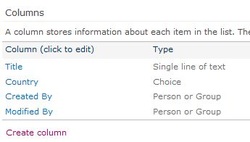 As you can see in the example image to the left, I've created the Country column as a Choice column.
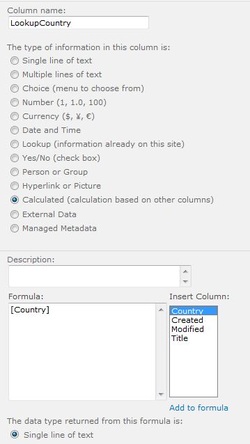 The next step is to create the column that will actually be used for the lookup. I'm going to call this column LookupCountry.
I'm going to designate is a Calculated value column. And then I'm going to insert the Country column.
The next thing you need to do is determine the data type that will be returned from the column. For my example, I'm good using Single line of text; therefore, I won't change the default value suggested by SharePoint.
So now we need to go to the second list, from where we want to reference the list of countries.
Create a new column on this second list and select Lookup as the type of information.
Make any additional selections you may need (such as whether to require that this column must contain information).
Select your first custom list, the one where you created the calculated value column at the Get information from drop-down list.
And then select the Calculated value column from the list (where it says In this column).
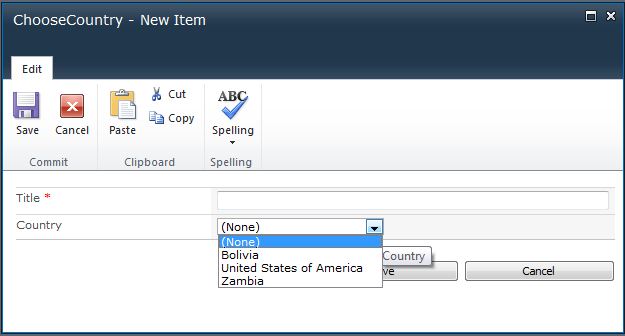
Save everything and voilá! Once some values are input in the first list, the lookup drop-down on the second list should display some values.
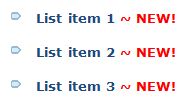
This solution allows adding a 'New!' flag to list items via the use of a special column in a custom list, as well as one line of XSL code.
| |
The first thing I do is I create a Yes/No column in my list (you can also create this column as a Site Column if you think you're going to be using it in more than one list or library). For the example, we're going to call this column 'NewYN.'
(If you prefer, you can use a Choice column with two menu options, 'Yes' and 'No,' instead.)
Then in my custom Style Sheet, I add the following code:
<xsl:if test="(@NewYN = 'True')">
<font size="1" color="#FF0000" ><xsl:value-of select="' ~ NEW!'"/></font>
</xsl:if>
In my example, I'm using the colour red (FF0000). You can change this colour to any colour of your choice. (For an article about Web Color Reference, click here.) The last step woudl be to modify the Content Query Web Part as appropriate so it can read your style sheets.
Follow the steps below if you are having problems with a web part on a web part page and you can't delete the web part in the usual way, which would be selecting Delete at the web part's edit menu.
- Go to the appropriate page
- Append ?contents=1 in the URL right after .aspx
- Press <Enter>
- SharePoint displays the Web Part Page Maintenance page
- Select the web part of your interest and then click the appropriate funciton on the toolbar, such as Delete
Keep in mind that whatever changes you make on the Web Part Maintenance page will affect all users who have access to the actual page.
One last thing. There's a reason why I always recommend my customers to always rename their web parts immediately after they have added them to a page. And the reason being is the Web Part Page Maintenance page. Once you are in this page, there is no way to distinguish a web part from another one if they are all called Content Editor, Image Viewer, or Calendar. I don't know you, but I'm not a mind reader.
If you cannot distinguish one Content Editor Web Part from another one because your customer failed to rename them after adding them to a page, try to rename the other web parts that are not corrupted. This will help you narrow it down. If that's not an option, well, I'll leave it up to you on how to disclose the bad news to your customers that you may end up removing the wrong web part. Believe me, I've been there myself and once I removed the wrong web part (or all of them because there was no way for me to tell them apart from this page) my customers learned their lesson and never forgot to rename their web parts ever again.
|
 RSS Feed